

Behind the Scenes: Creating Professional 'Signing Day' Photos on a Youth Baseball Budget
How We Made Our Players Feel Like D1 Recruits Without Breaking the Bank (And How We Can Do It For Your Club Too)


The Idea Behind Signing Day Photos
When our first Gorilla Baseball Club teams came together for the 2024-2025 season, we wanted to create a memorable moment that made our 9u-14u players feel special. If you've been around college baseball recruiting, you've seen those 'signing day' photos—high school seniors announcing their college commitments in front of professional-looking backdrops with their school logos, posed with their families, celebrating a major milestone.
We thought: why wait until college? Let's give our youth players that same experience right now. These kids just committed to a travel baseball organization, they're embarking on a journey with new teammates and coaches, and their families are investing time and resources into their development. That deserves to be celebrated.
But here's the reality—we're a youth baseball program, not a professional photography studio. We needed to create something impressive without spending thousands of dollars. Here's exactly how we did it.
And if you'd rather have someone else handle it? We're happy to help. Gorilla Baseball can run a signing day event for your club. Call us to discuss how we can make your players feel like pros.
Two Approaches: The DIY Green Screen vs. The Step-and-Repeat
Before we dive into the details, let me give you the two main options we considered:
Option 1: The Improvised Green Screen (What We Did)
This is the creative, budget-friendly approach that requires some post-production editing. You photograph players in front of a green backdrop, then digitally replace that green with your custom branded background.
Pros: Lower upfront cost, maximum flexibility with backgrounds, can create multiple background designs and apply them to all photos, easy to transport and store.
Cons: Requires photo editing skills or software, more time-intensive in post-production, lighting must be even on the green screen.
Option 2: The Step-and-Repeat Banner
This is what you see at red carpet events and professional press conferences—a large banner with repeating logos that serves as the backdrop.
Pros: No editing required—the photo is done when you take it, looks professional immediately, can be reused for all future events, serves double duty as facility branding.
Cons: Higher upfront cost ($200-500 for a professional banner), less flexibility—you're committed to one design, requires proper lighting to avoid shadows, takes up storage space.
If you're planning to do these photos annually and you have a strong, established brand, the step-and-repeat is worth the investment. For us as a new program still establishing our visual identity, the green screen gave us the flexibility to experiment.
Our Improvised Green Screen Setup
The Backdrop
We didn't go out and buy a professional green screen. Instead, we improvised with what we could source affordably:
Option A: Green fabric or tablecloths – A solid green sheet, large piece of fabric, or even green tablecloths from a party supply store can work. The key is finding something large enough to fill the frame behind your subject (at least 6' x 8') and solid in color with minimal wrinkles.
Option B: Green poster board or foam core – For individual headshots or upper-body shots, you can use large green poster boards or foam core boards from an art supply store. These are stiffer and less prone to wrinkles, though you'll need to tape several together for a larger backdrop.
Option C: Green screen backdrop kit – If you want something reusable and more professional, you can find affordable collapsible green screen kits online for $30-75. These come with stands and are easier to set up repeatedly.
Mounting solutions: If you have a baseball facility with batting cages or netting, you likely have cables or framework you can use to hang your backdrop—that's what we did, and it cost nothing. Otherwise, you can use PVC pipe and clamps ($15-30), a portable backdrop stand, or even hang fabric from ceiling hooks if your space allows it.
We hung our green fabric backdrop using the cables that hold the netting at our facility - a simple and free mounting solution since we already had those structural elements in place. Total cost for the backdrop material was under $40.
The Lighting (Don't Underestimate This!)
Here's where most non-professionals get it wrong: They drastically underestimate how much lighting they need indoors. Your facility's overhead lights are NOT enough. Even if it looks bright to your eyes, cameras need way more light than you think to produce clean, professional-looking photos.
This is where most DIY green screen setups fail. You need even, diffused lighting on both the subject AND the green backdrop. Without proper lighting, your green screen will have shadows and uneven tones that make editing a nightmare. Here's what you need to know:
Your Lighting Options
Option 1: Professional Photography Umbrella Lights
If you want to go the professional route, photography umbrella lighting kits are designed specifically for this. They provide soft, diffused light that eliminates harsh shadows and creates even illumination.
What to look for:
• A 2-light or 3-light umbrella kit with stands
• LED bulbs (cooler temperature, lower energy cost)
• Adjustable height stands (6-8 feet)
• White or silver umbrellas for diffusion
• Cost: $80-200 for a decent kit
Pros: Professional quality, adjustable, portable, designed for photography, produces the best results.
Cons: More expensive, requires assembly and storage space.
Option 2: Home Depot Work Lights (What We Did)
This is the budget-friendly option that still delivers great results. We already had LED work lights at our facility (the kind you'd find in the construction/shop lighting section at Home Depot or Lowe's), so we just used those. If you need to buy them, they're very affordable.
What to look for:
• Two or three 5000-lumen LED work lights with stands ($20-30 each)
• Optional: clamp work light for fill lighting ($15)
• Optional: White fabric or shower curtain to diffuse the light and soften shadows
• Cost if purchasing: $40-75
Pros: Cheap, readily available at any hardware store, bright, durable (designed for job sites), can double as facility work lights when not shooting photos.
Cons: Light can be harsh without diffusion, not as adjustable as photo equipment, heavier and bulkier.
Reality check: We tried taking photos with just our facility's overhead lights first. The results were terrible—muddy colors, shadows everywhere, and the green screen looked like three different shades of green. Once we added the work lights, it was night and day. Literally. Don't skip this step.
How to Set Up Your Lights
Regardless of which lighting option you choose, here's how to position them:
1. Separate the subject from the backdrop. Have your player stand 3-6 feet in front of the green screen. This prevents green color spill on the player and makes it easier to light both separately.
2. Light the green screen evenly. Position two lights at 45-degree angles to the backdrop, about 3-4 feet away from the green screen. Aim them at the backdrop, not at your subject. You want the entire green backdrop to be the same shade of green with no shadows or hot spots.
3. Light your subject. Position your main light source in front of and slightly above the player (this is called a 'key light' in photography). If you have a third light, position it on the opposite side at a lower intensity for 'fill light' to reduce shadows on the player's face.
4. Diffuse harsh light. If you're using work lights, the light can be harsh and create strong shadows. To soften it, hang a white sheet, shower curtain, or even a stretched white t-shirt in front of the light. This diffuses the light and creates a more flattering look. (Yes, we literally used a white t-shirt stretched over one of our work lights. It worked great.)
Pro tip: Take a test shot and zoom in on your green screen on your phone or camera. If you see dark patches or bright spots, adjust your lights until the green is consistent across the entire backdrop. Walk around and look at it from different angles. This will save you hours in editing later.
The bottom line on lighting: More light is almost always better than not enough. If your photos look dim or have a yellow/orange tint, you need more light. If your green screen has shadows, you need better light placement. Don't try to 'fix it in post'—get the lighting right during the shoot and editing will be 10x easier.
The Camera Setup
We used a Digital SLR camera with a 50mm lens, which is ideal for portrait photography. The 50mm focal length produces natural-looking photos without distortion and creates a nice shallow depth of field that makes subjects pop against the background.
Game-changer equipment: Remote camera shutter. This small accessory made a huge difference in how the photo session felt. Instead of being stuck behind the camera, we could move around, talk to the kids, give them posing directions, and even demonstrate poses while still controlling when the photo was taken. It felt a lot more professional for everyone—less like a school picture day, more like a real photo shoot. The kids responded better because we were engaging with them face-to-face, not hiding behind a camera.
Camera options:
• Digital SLR or mirrorless camera (what we used) – Best image quality, full control, interchangeable lenses. Entry-level DSLRs start around $400-600 used. The 50mm lens is often called the 'nifty fifty' and can be found for $100-200. Remote shutter: $15-30.
• High-end smartphone (budget alternative) – Modern iPhone or Samsung can produce excellent results in good lighting. Won't get quite the same depth of field, but definitely usable. Many phones also support Bluetooth remote shutters.
Critical: Make sure you have plenty of memory cards. You'll be shooting a lot of photos in a short time. We shot 8-10 photos per player across five poses—that's 40-50 photos per player. With 60+ players, you're looking at 2,500-3,000+ photos. Have at least 2-3 high-capacity memory cards (32GB or larger) so you're not stopping mid-session to offload photos.
Essential camera settings and setup:
• Use a tripod or stable surface – Consistency is key. Every photo should be from the same height and angle. Mount the camera at chest/shoulder height for a flattering perspective.
• Shoot in the highest resolution available – Use RAW format if your camera supports it (gives you maximum editing flexibility) or the highest quality JPEG setting. You can always make images smaller, but you can't add resolution later.
• Frame wider than you need – Leave room around the subject. It's easier to crop in than to wish you had more space. Make sure there's green screen visible all around the player on every side.
• Test your setup before players arrive – Take test shots with a volunteer, check the lighting on both the green screen and the subject, make sure your remote shutter is working, and verify your camera settings. The last thing you want is to discover a problem when you have 15 kids waiting in line.
Running the Photo Session
We set up a photo station at our facility. Here's how we organized it:
The Setup and Props
• Time allocation: 3-5 minutes per player (includes all poses, taking multiple shots, and quick review)
• Essential props: Gorilla hat (team cap), Player Contract document (more on this below), jerseys with player names, pen for signing pose
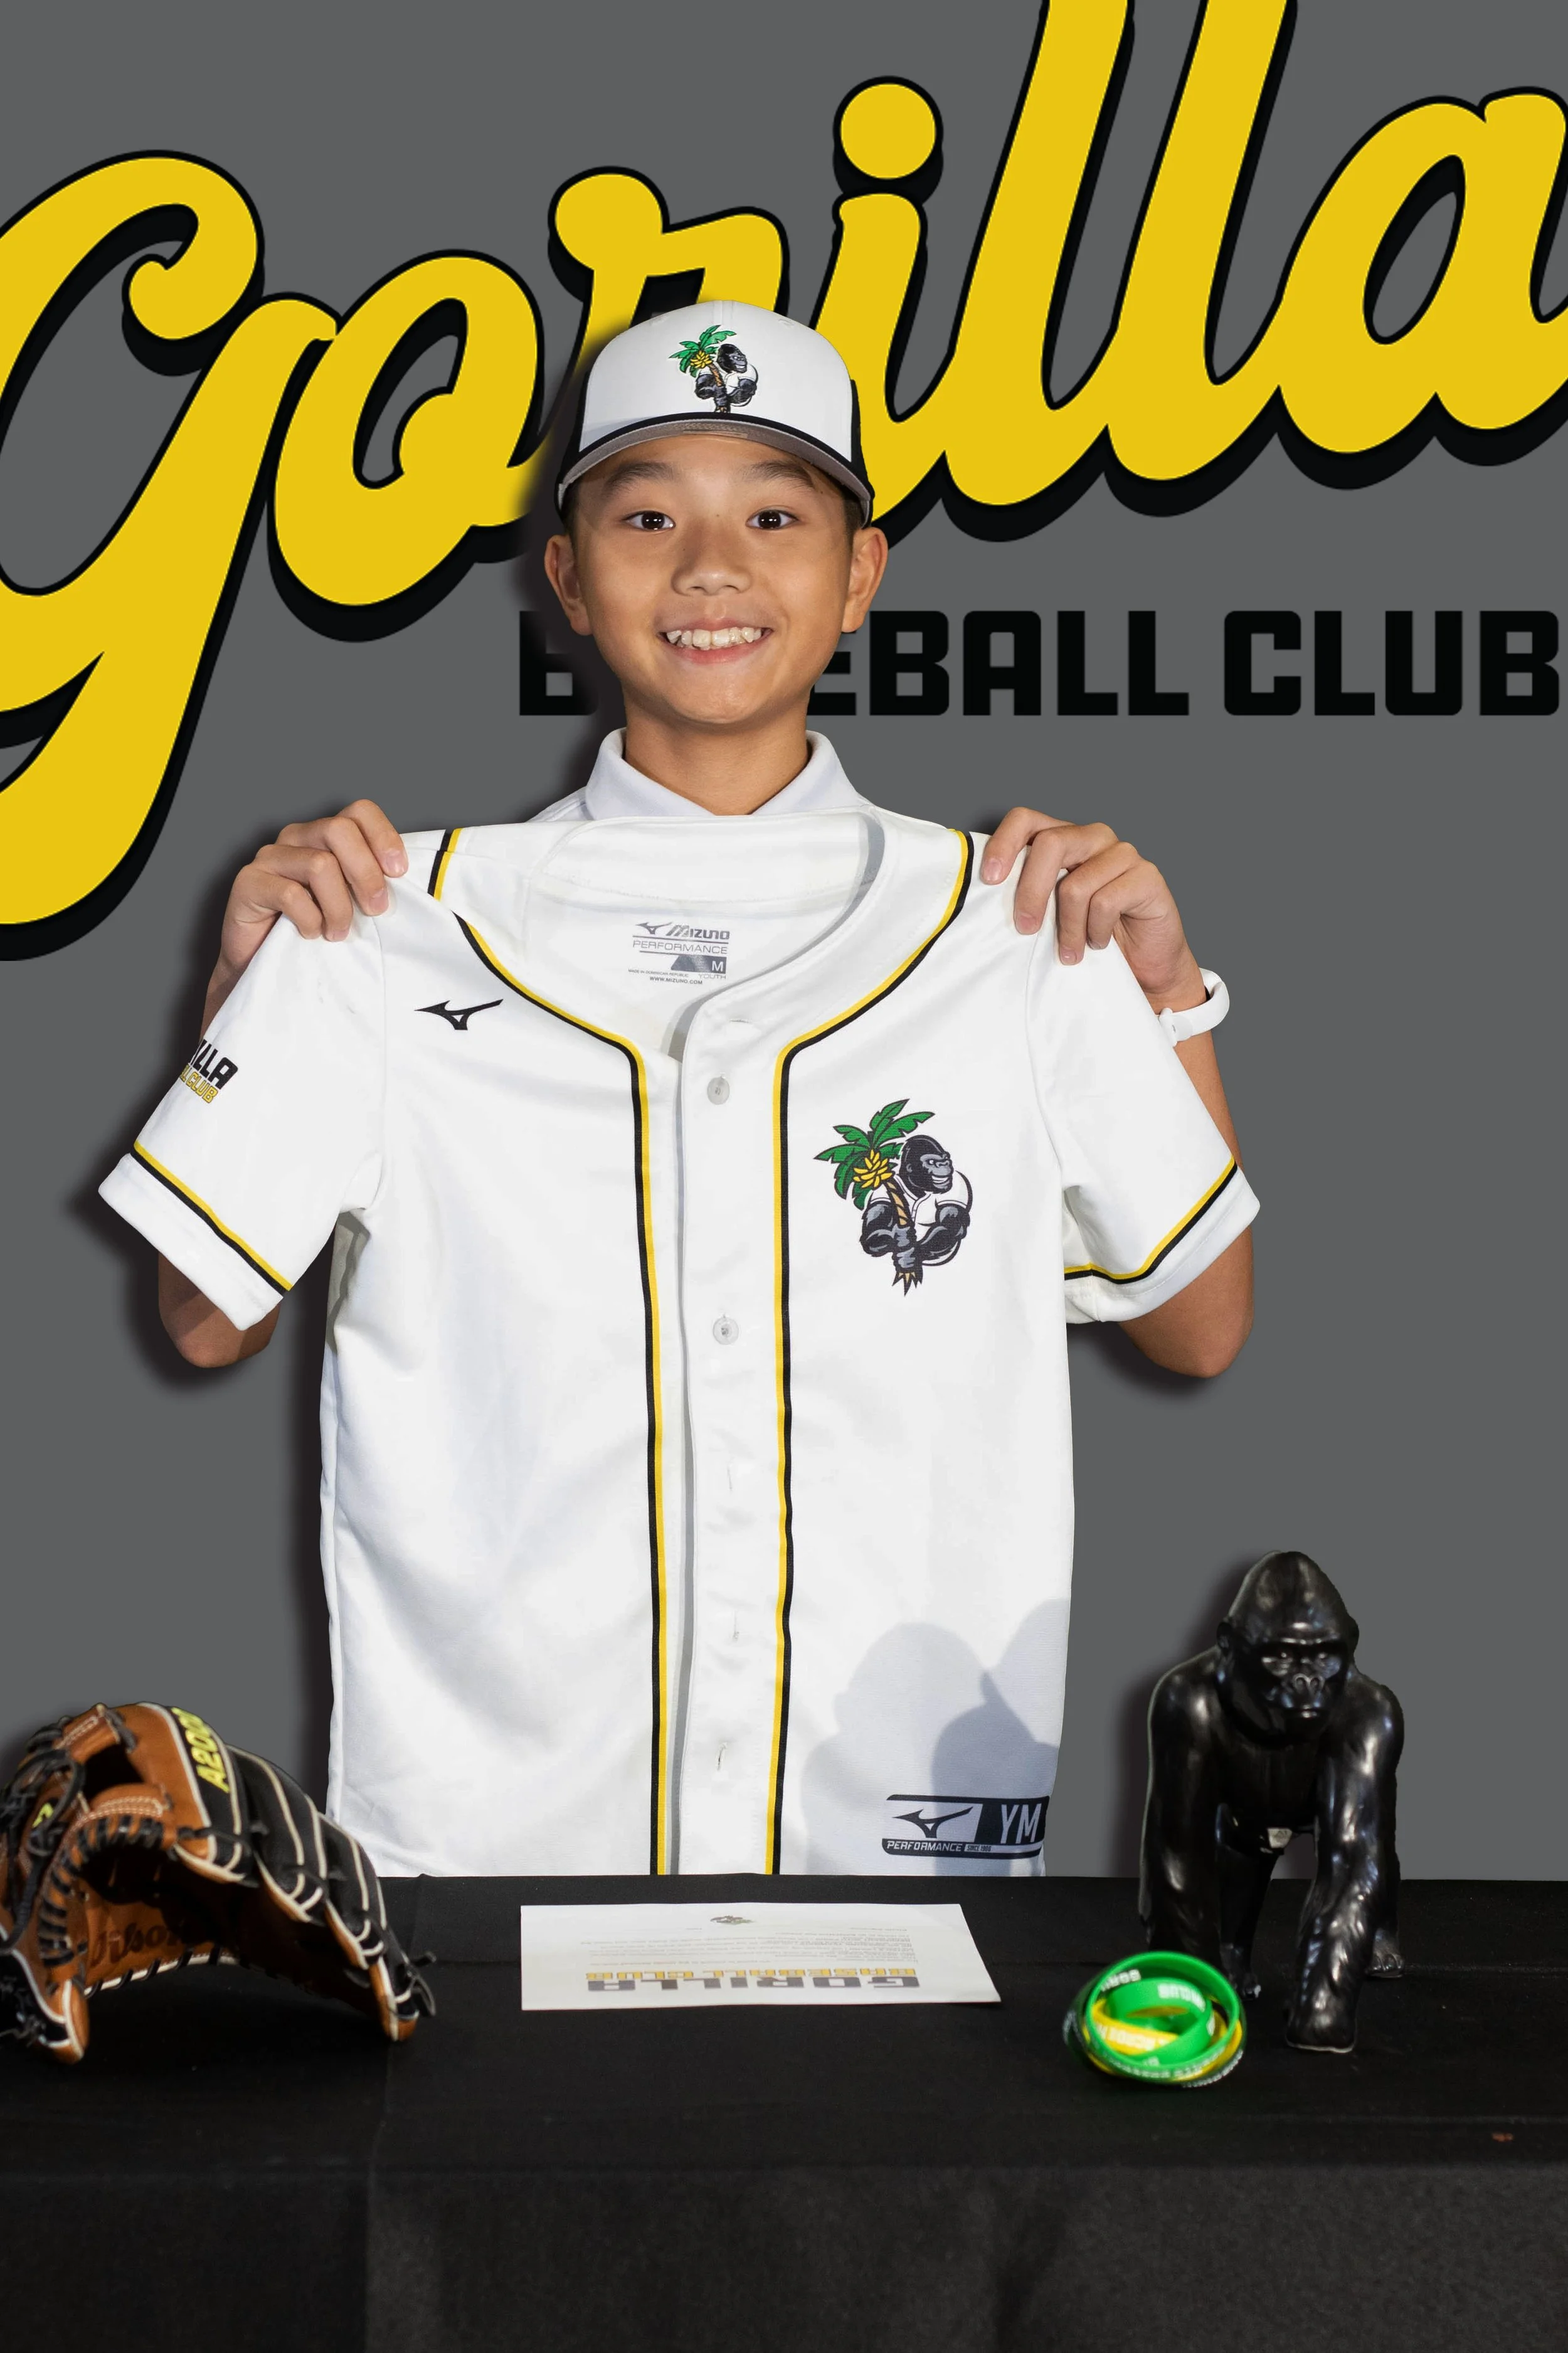
Important note on jerseys: If you're going to do jersey poses, you need actual jersey props available. We had new players use blank jerseys, but our returning players brought their current year's jersey with their name and number on it. Having their name visible on the jersey adds a really cool, personalized touch to the photos—it looks way more professional than a blank jersey. If you're a first-year program, consider having at least a few sample jerseys made up with generic numbers that players can hold.
Our Five Standard Poses
We kept it simple and ran each player through five specific poses. This gave us consistency across all photos while still capturing the 'signing day' feel:
1. Putting on the Gorilla hat – Player reaches up and puts the team cap on their head. This captured the moment of 'becoming a Gorilla.' Action shots like this look dynamic and less stiff than straight portraits.
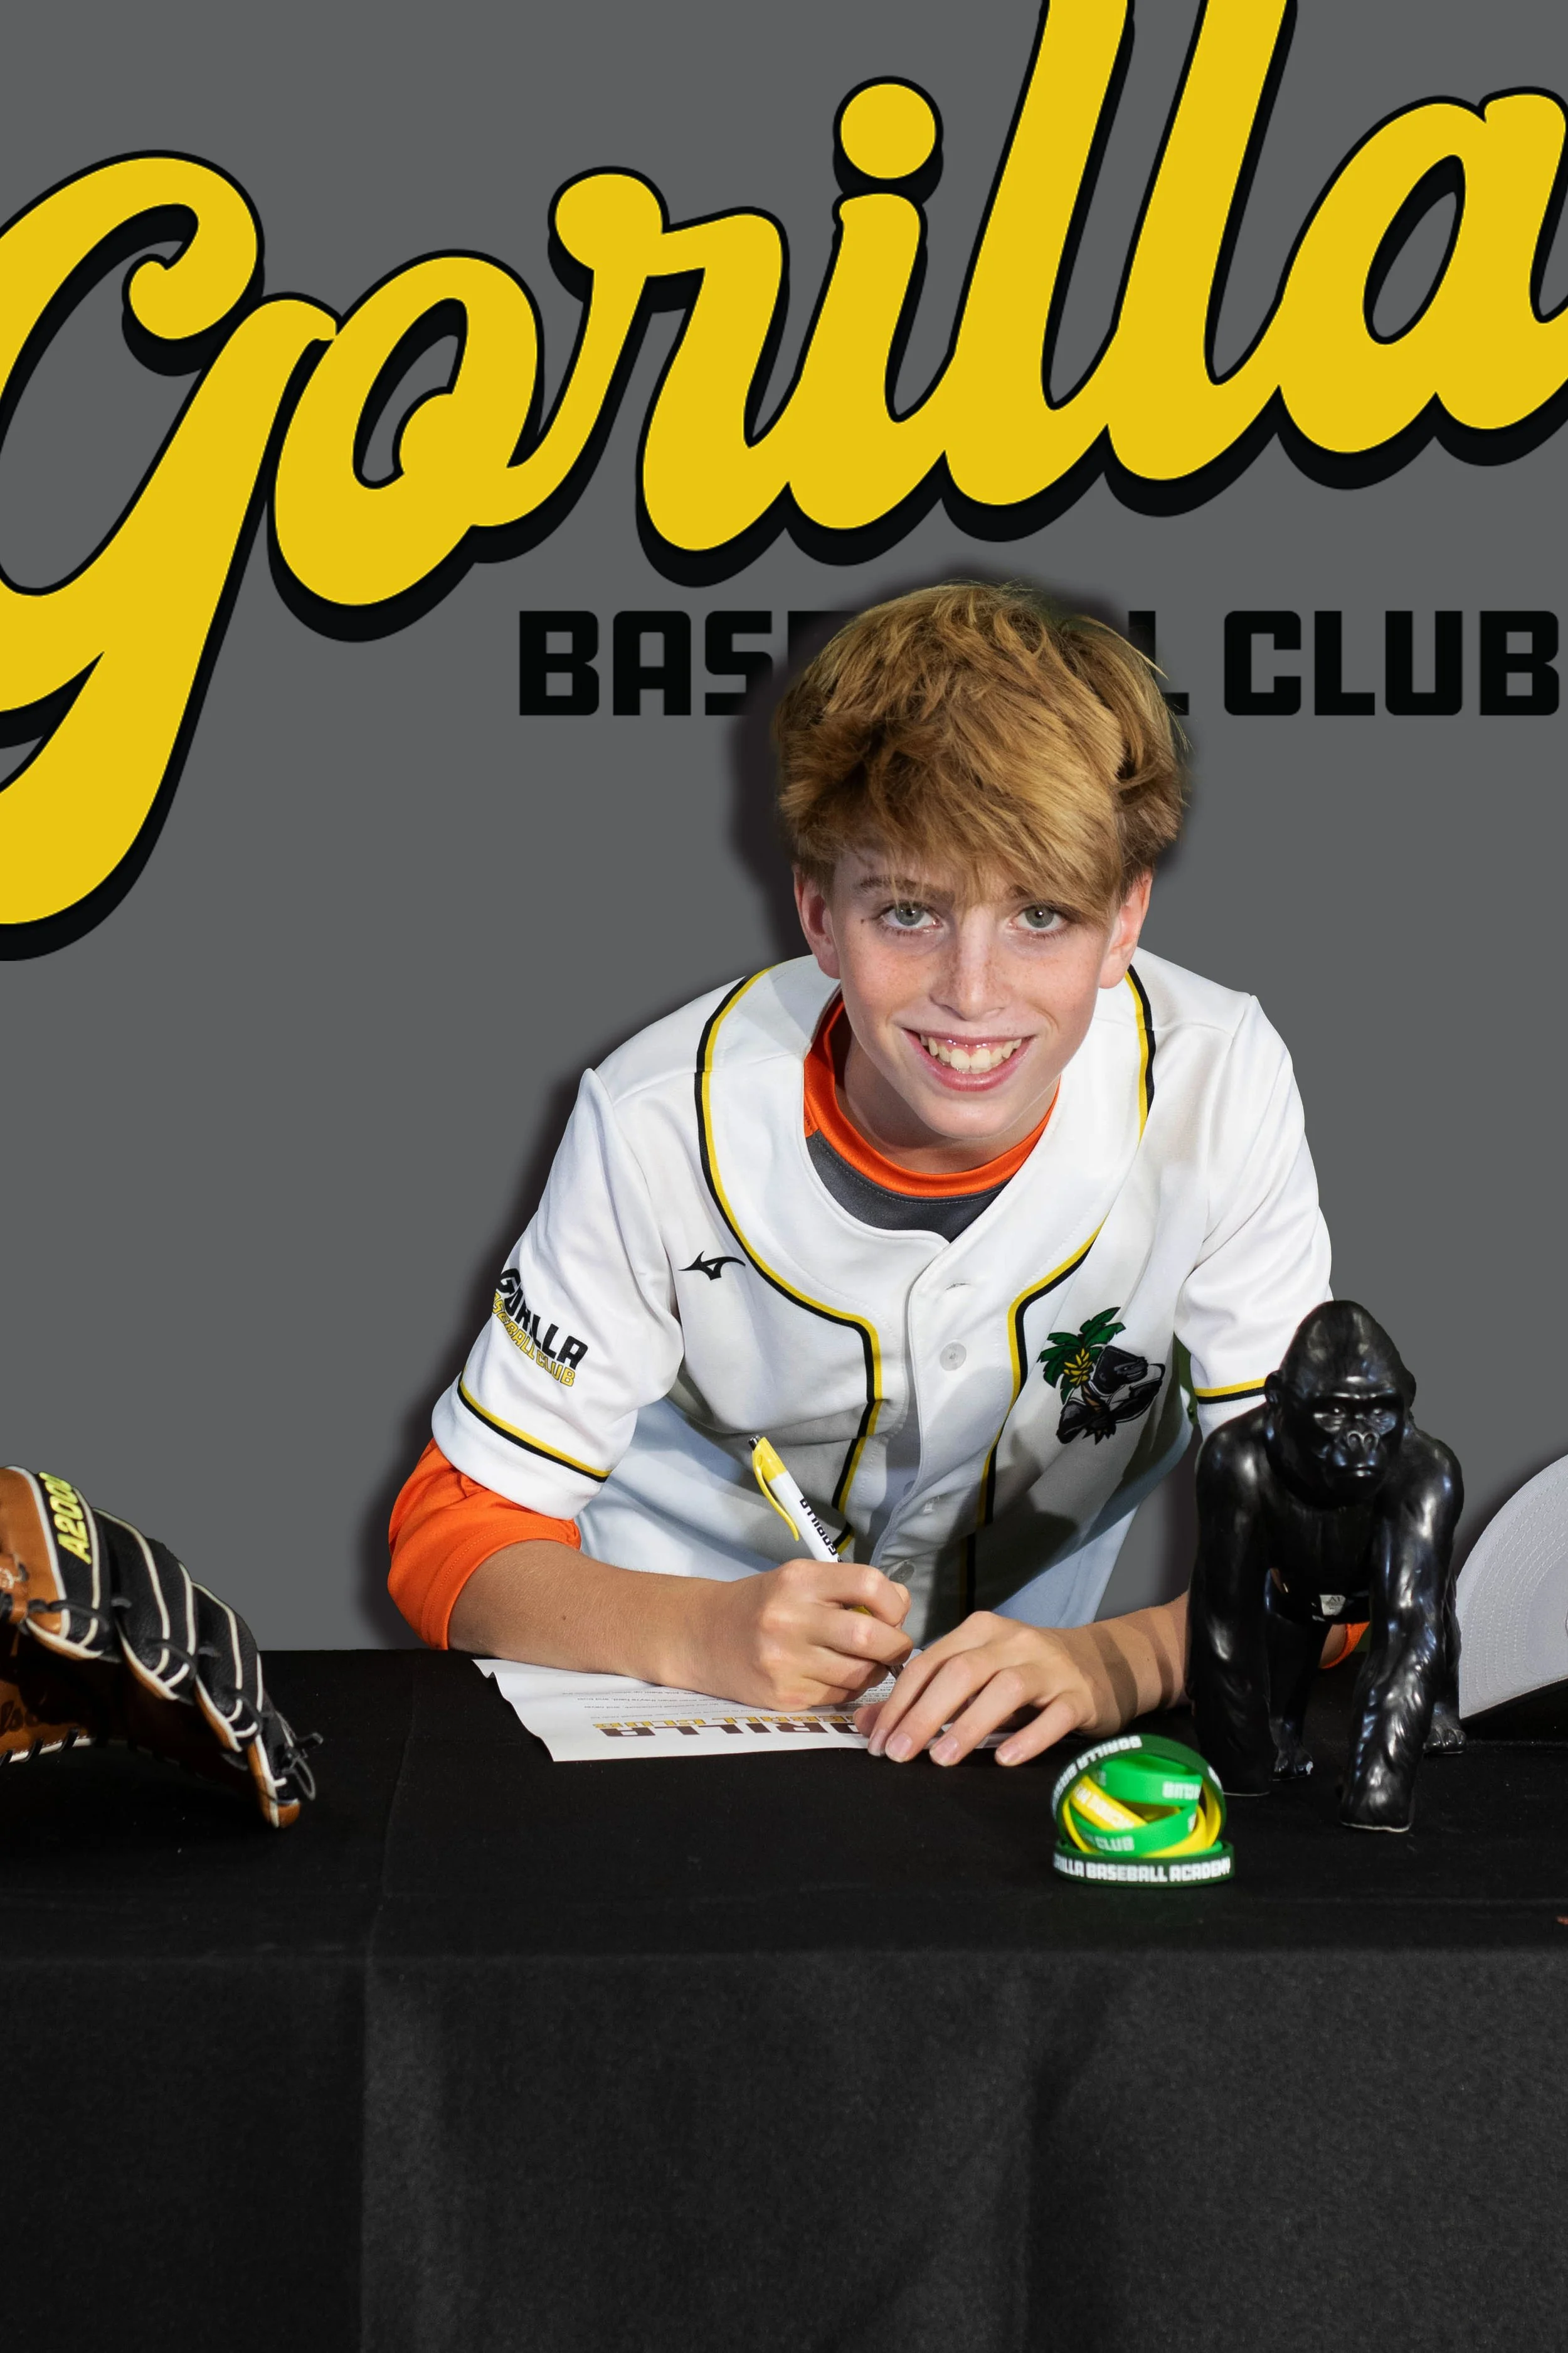
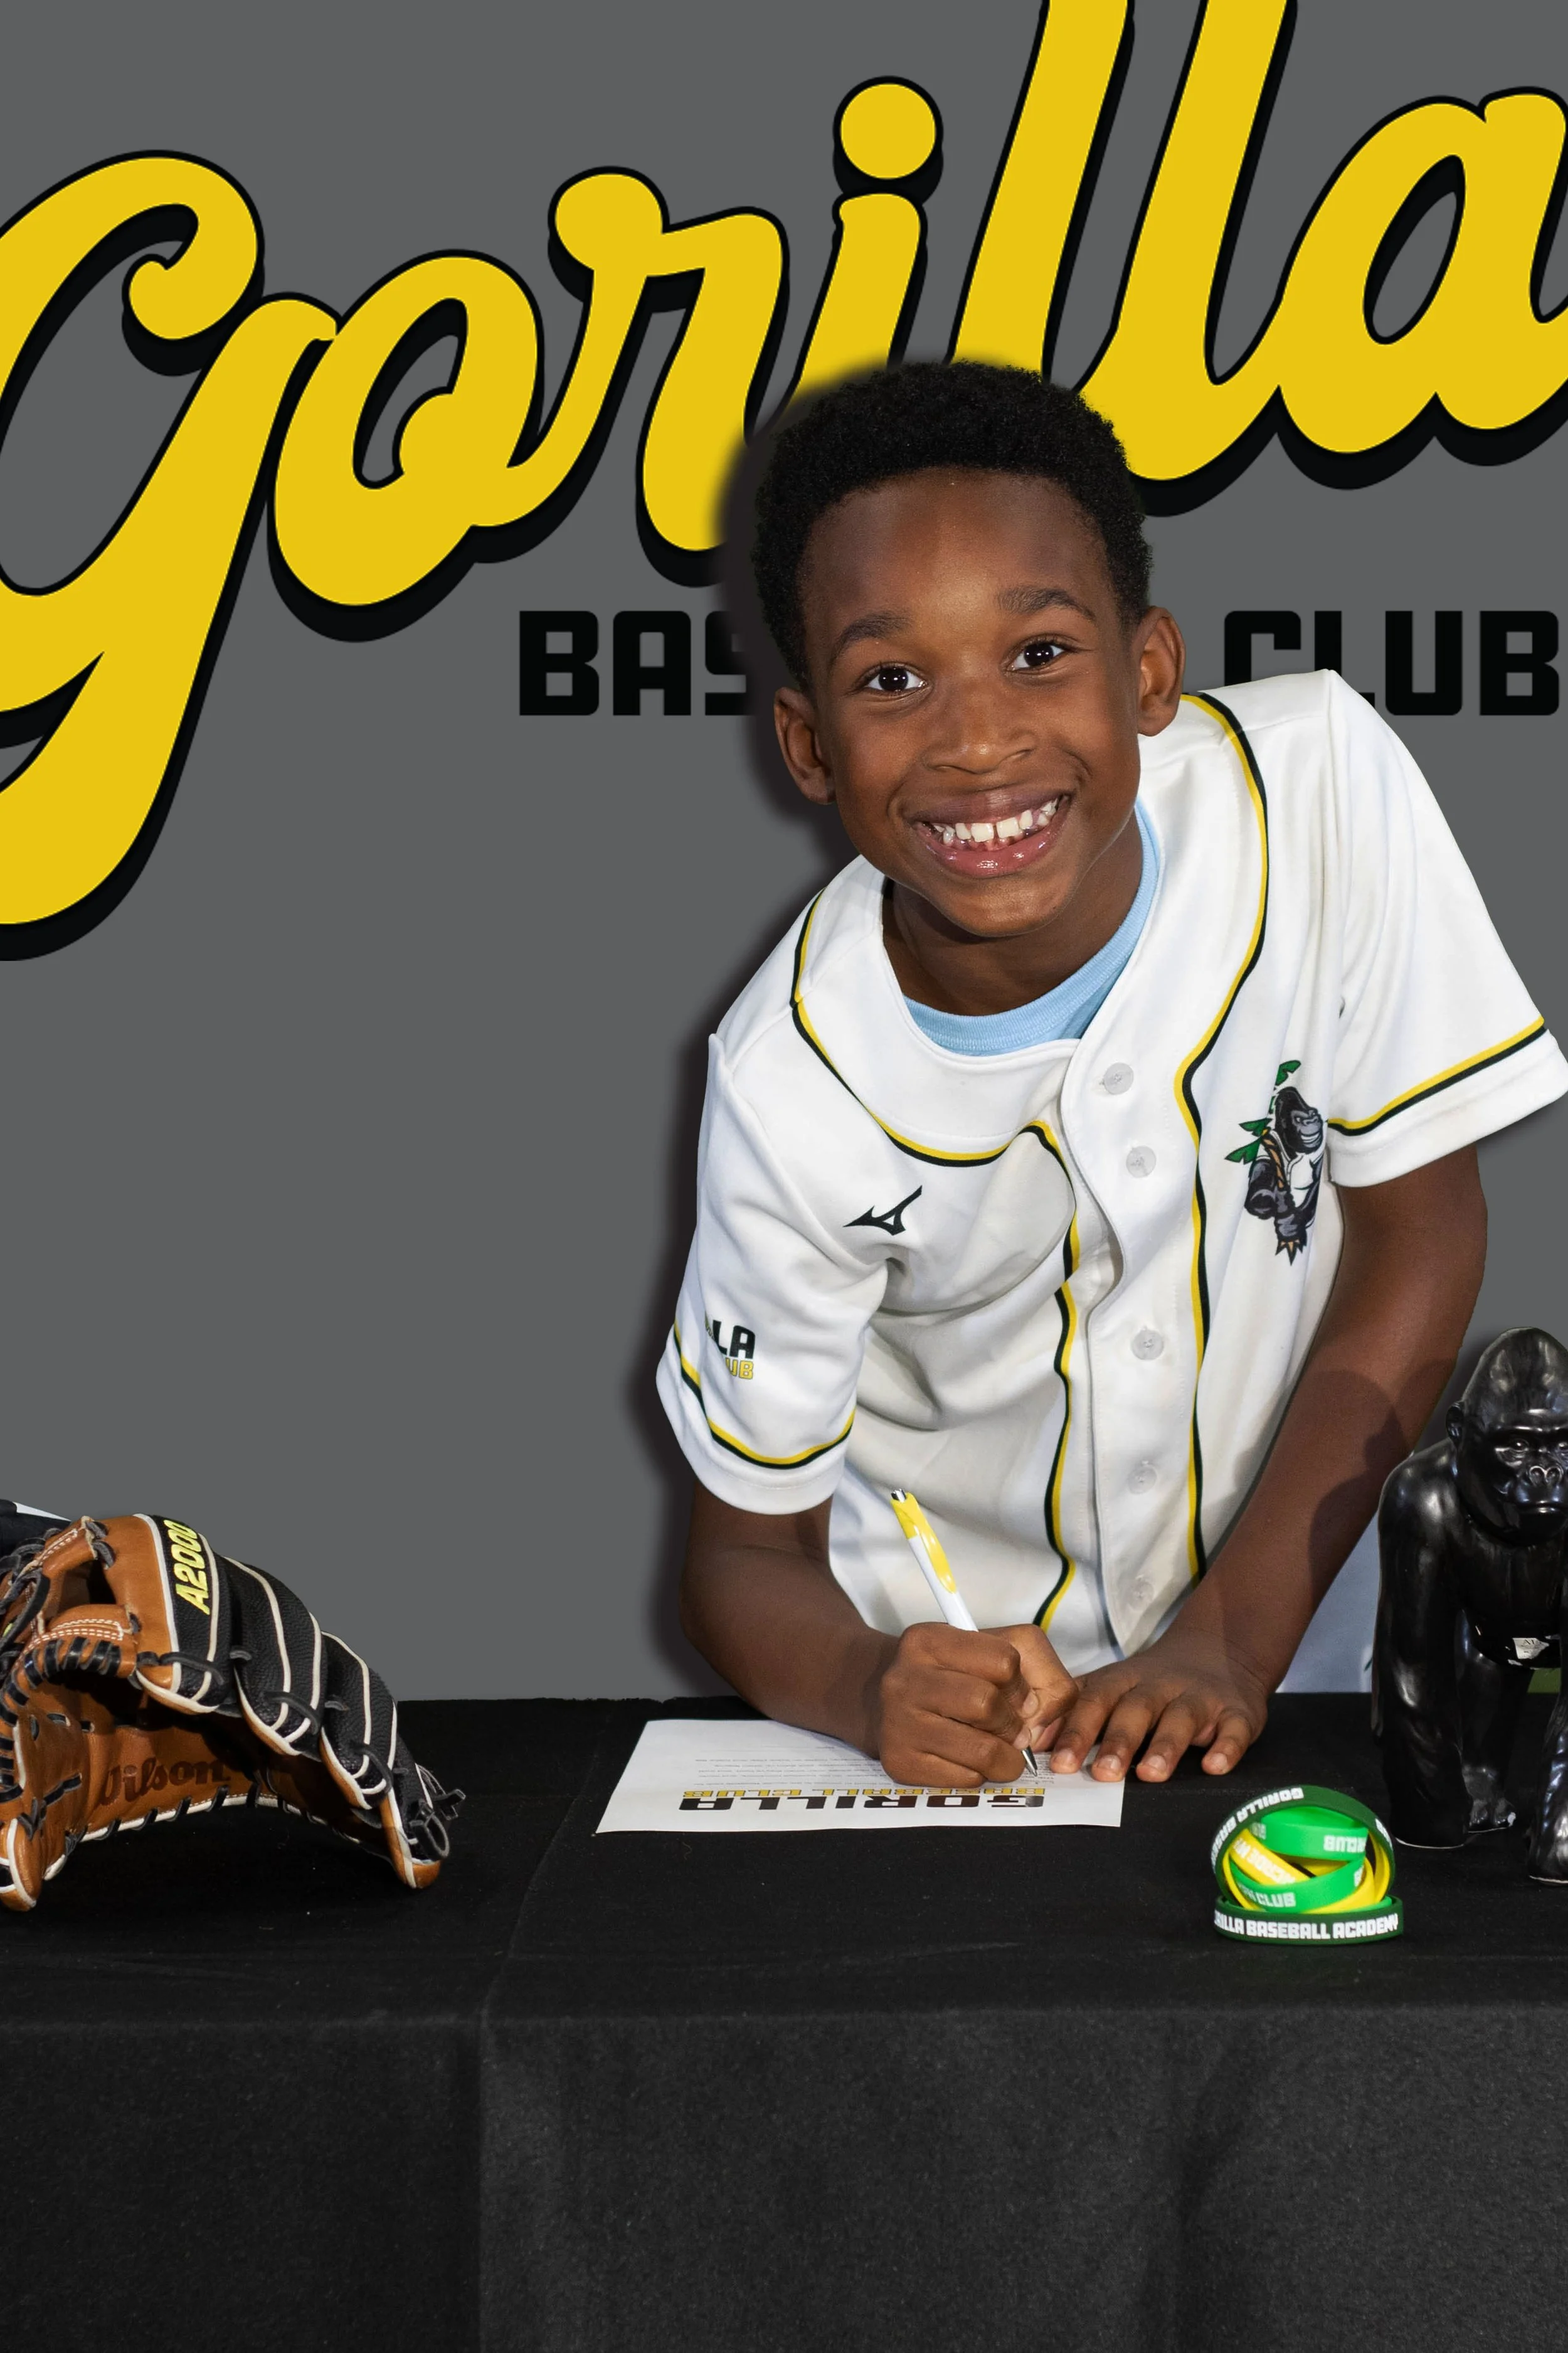
2. Signing the player contract – Player leans over a table or holds a clipboard with their 'Player Contract' and poses with pen in hand, mid-signature. This is the classic signing day moment.
About the Player Contract: This wasn't just a random prop—we actually created a meaningful player contract that reinforced what our program is all about. The contract included commitments like:
• 'I will be a good teammate'
• 'I will try my best to do what the coaches ask me to do'
• 'I will practice and work hard to become a better player'
• 'I will represent Gorilla Baseball Club with respect and sportsmanship'
This is all in the effort to commit to being a better player—because that's what this is all about. The signing photo isn't just for show; it's the player making a genuine commitment to themselves and the team. Many families actually had their player read and sign the real contract after the photo shoot, and we sent them home with a copy. It became more than just a photo prop—it became a meaningful document that set expectations and reinforced our program's values from day one.
3. Holding up the signed player contract – After 'signing' their contract, the player holds up the document toward the camera, either with a proud smile or a serious game face. This is the 'I committed!' announcement photo. Some of our players really got into this moment—you could see the pride in their faces knowing they just committed to being a better player and teammate.
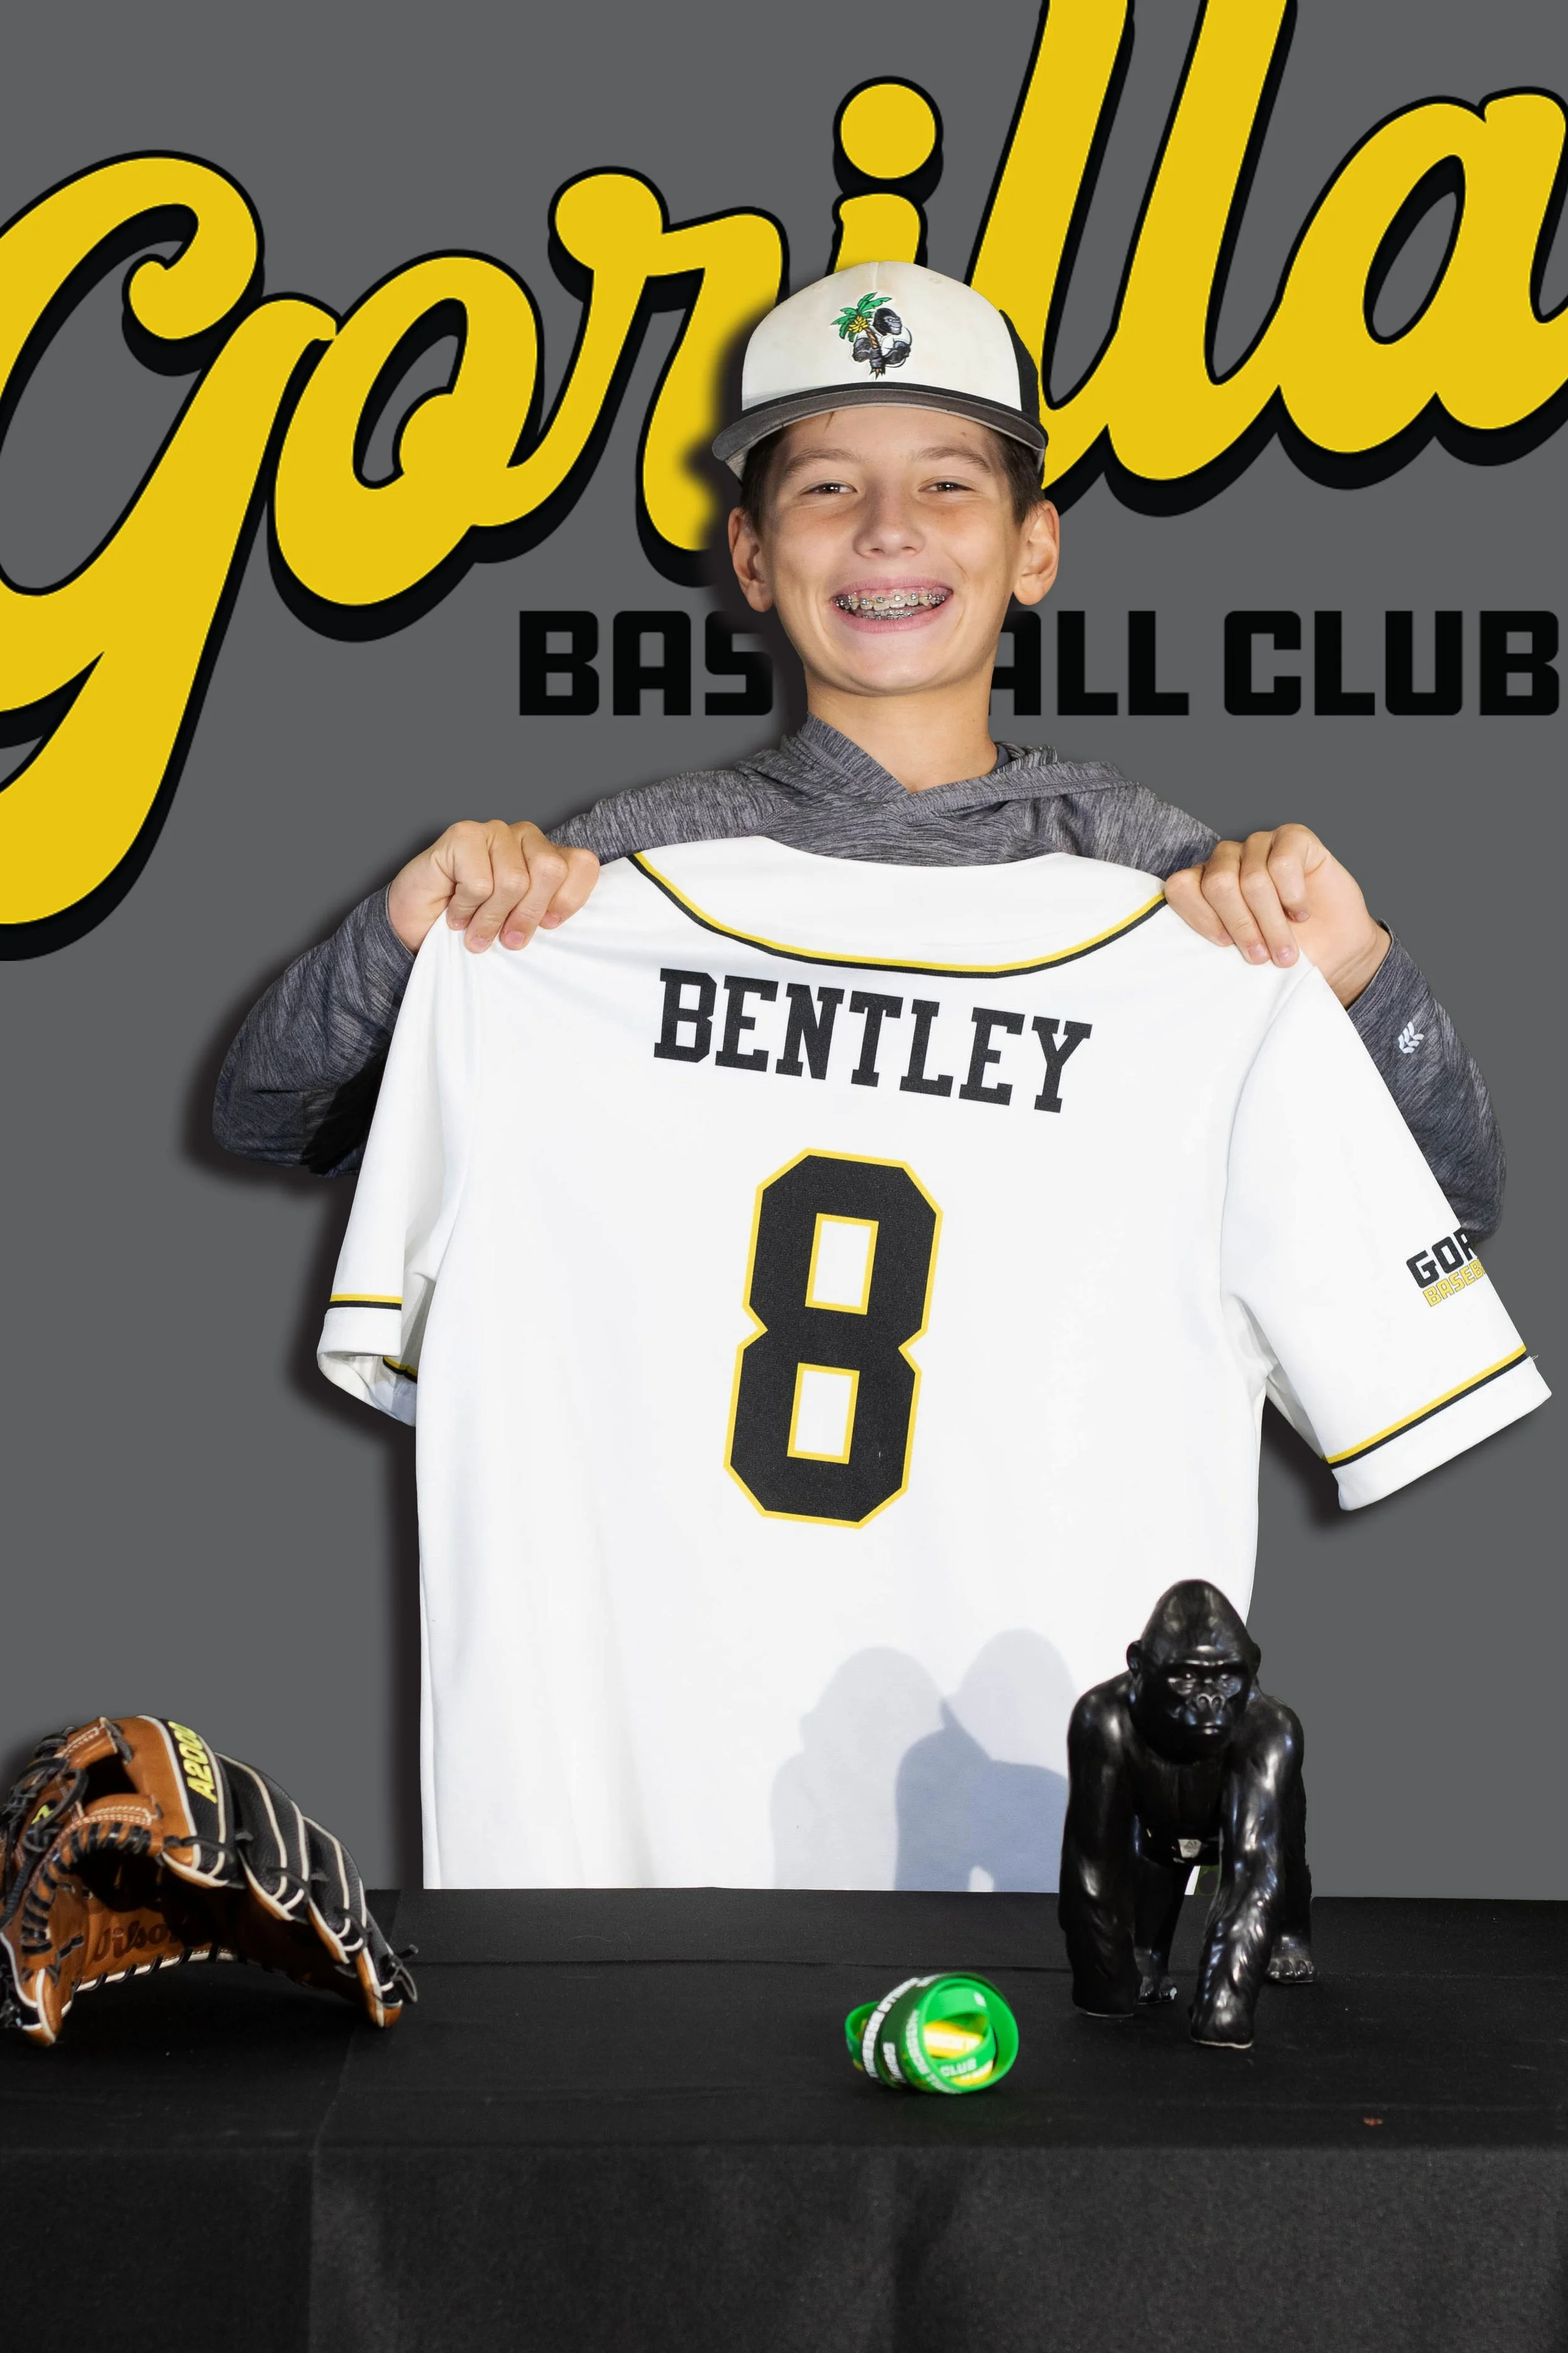
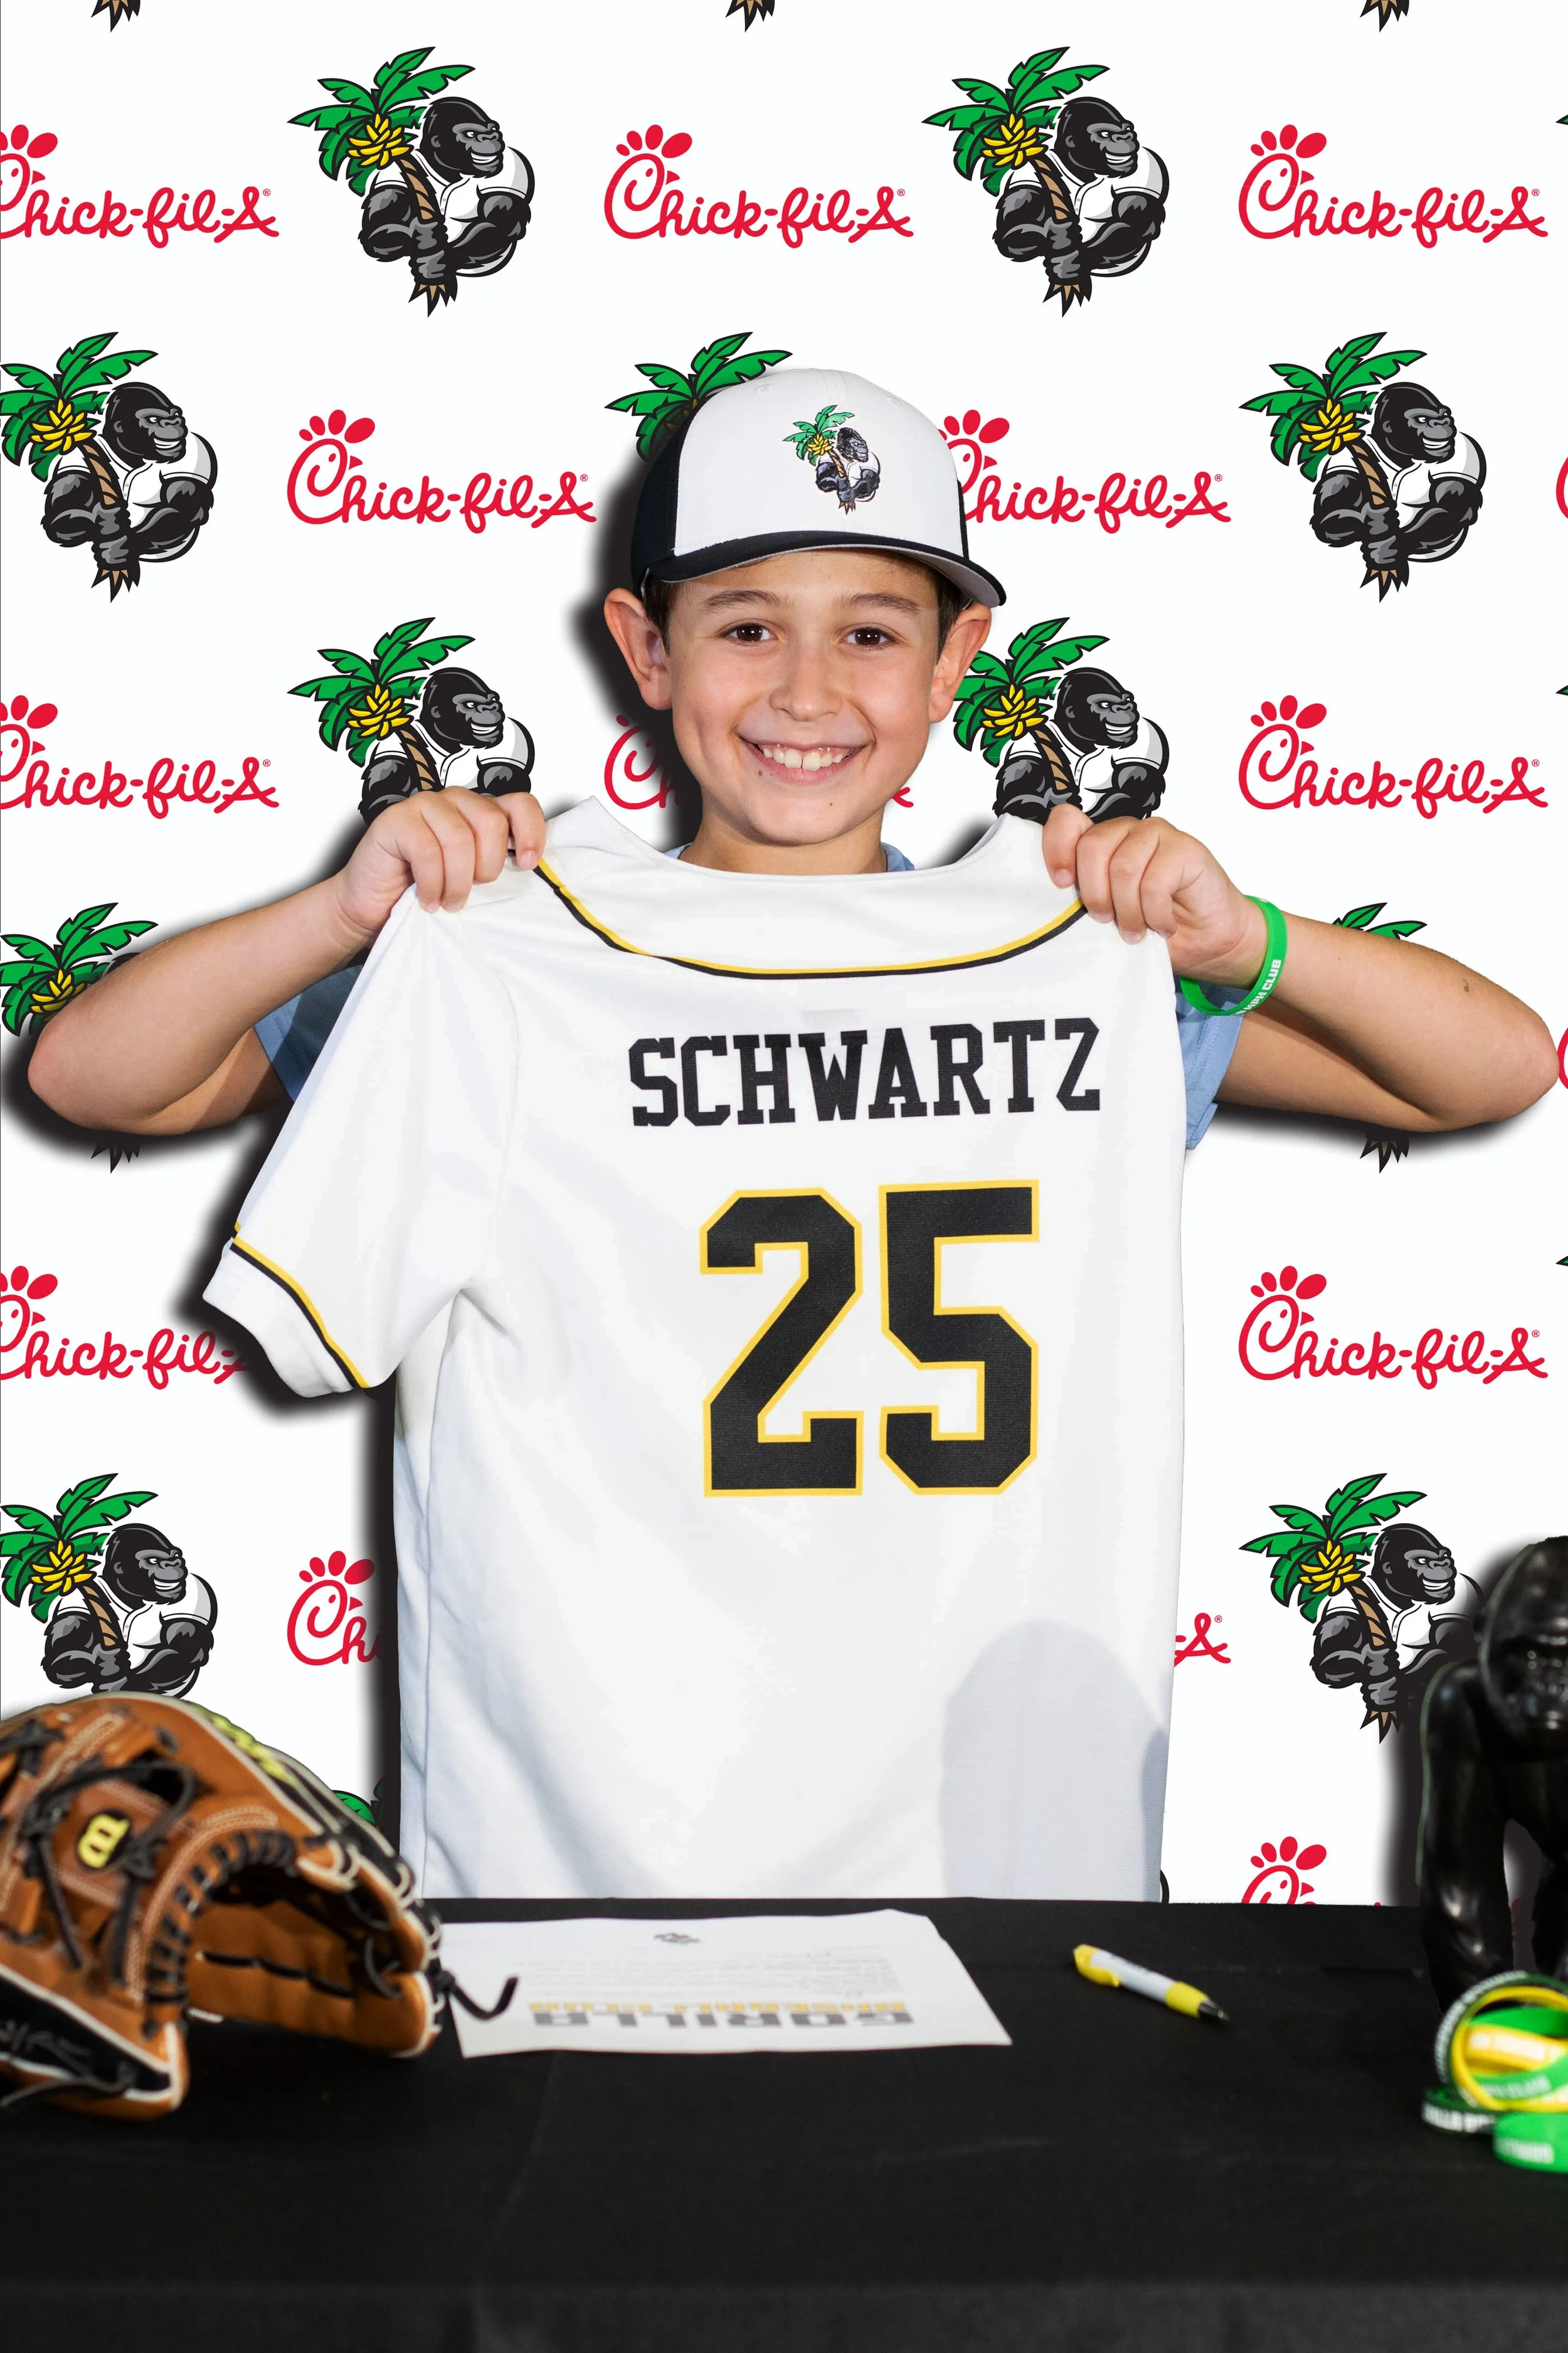
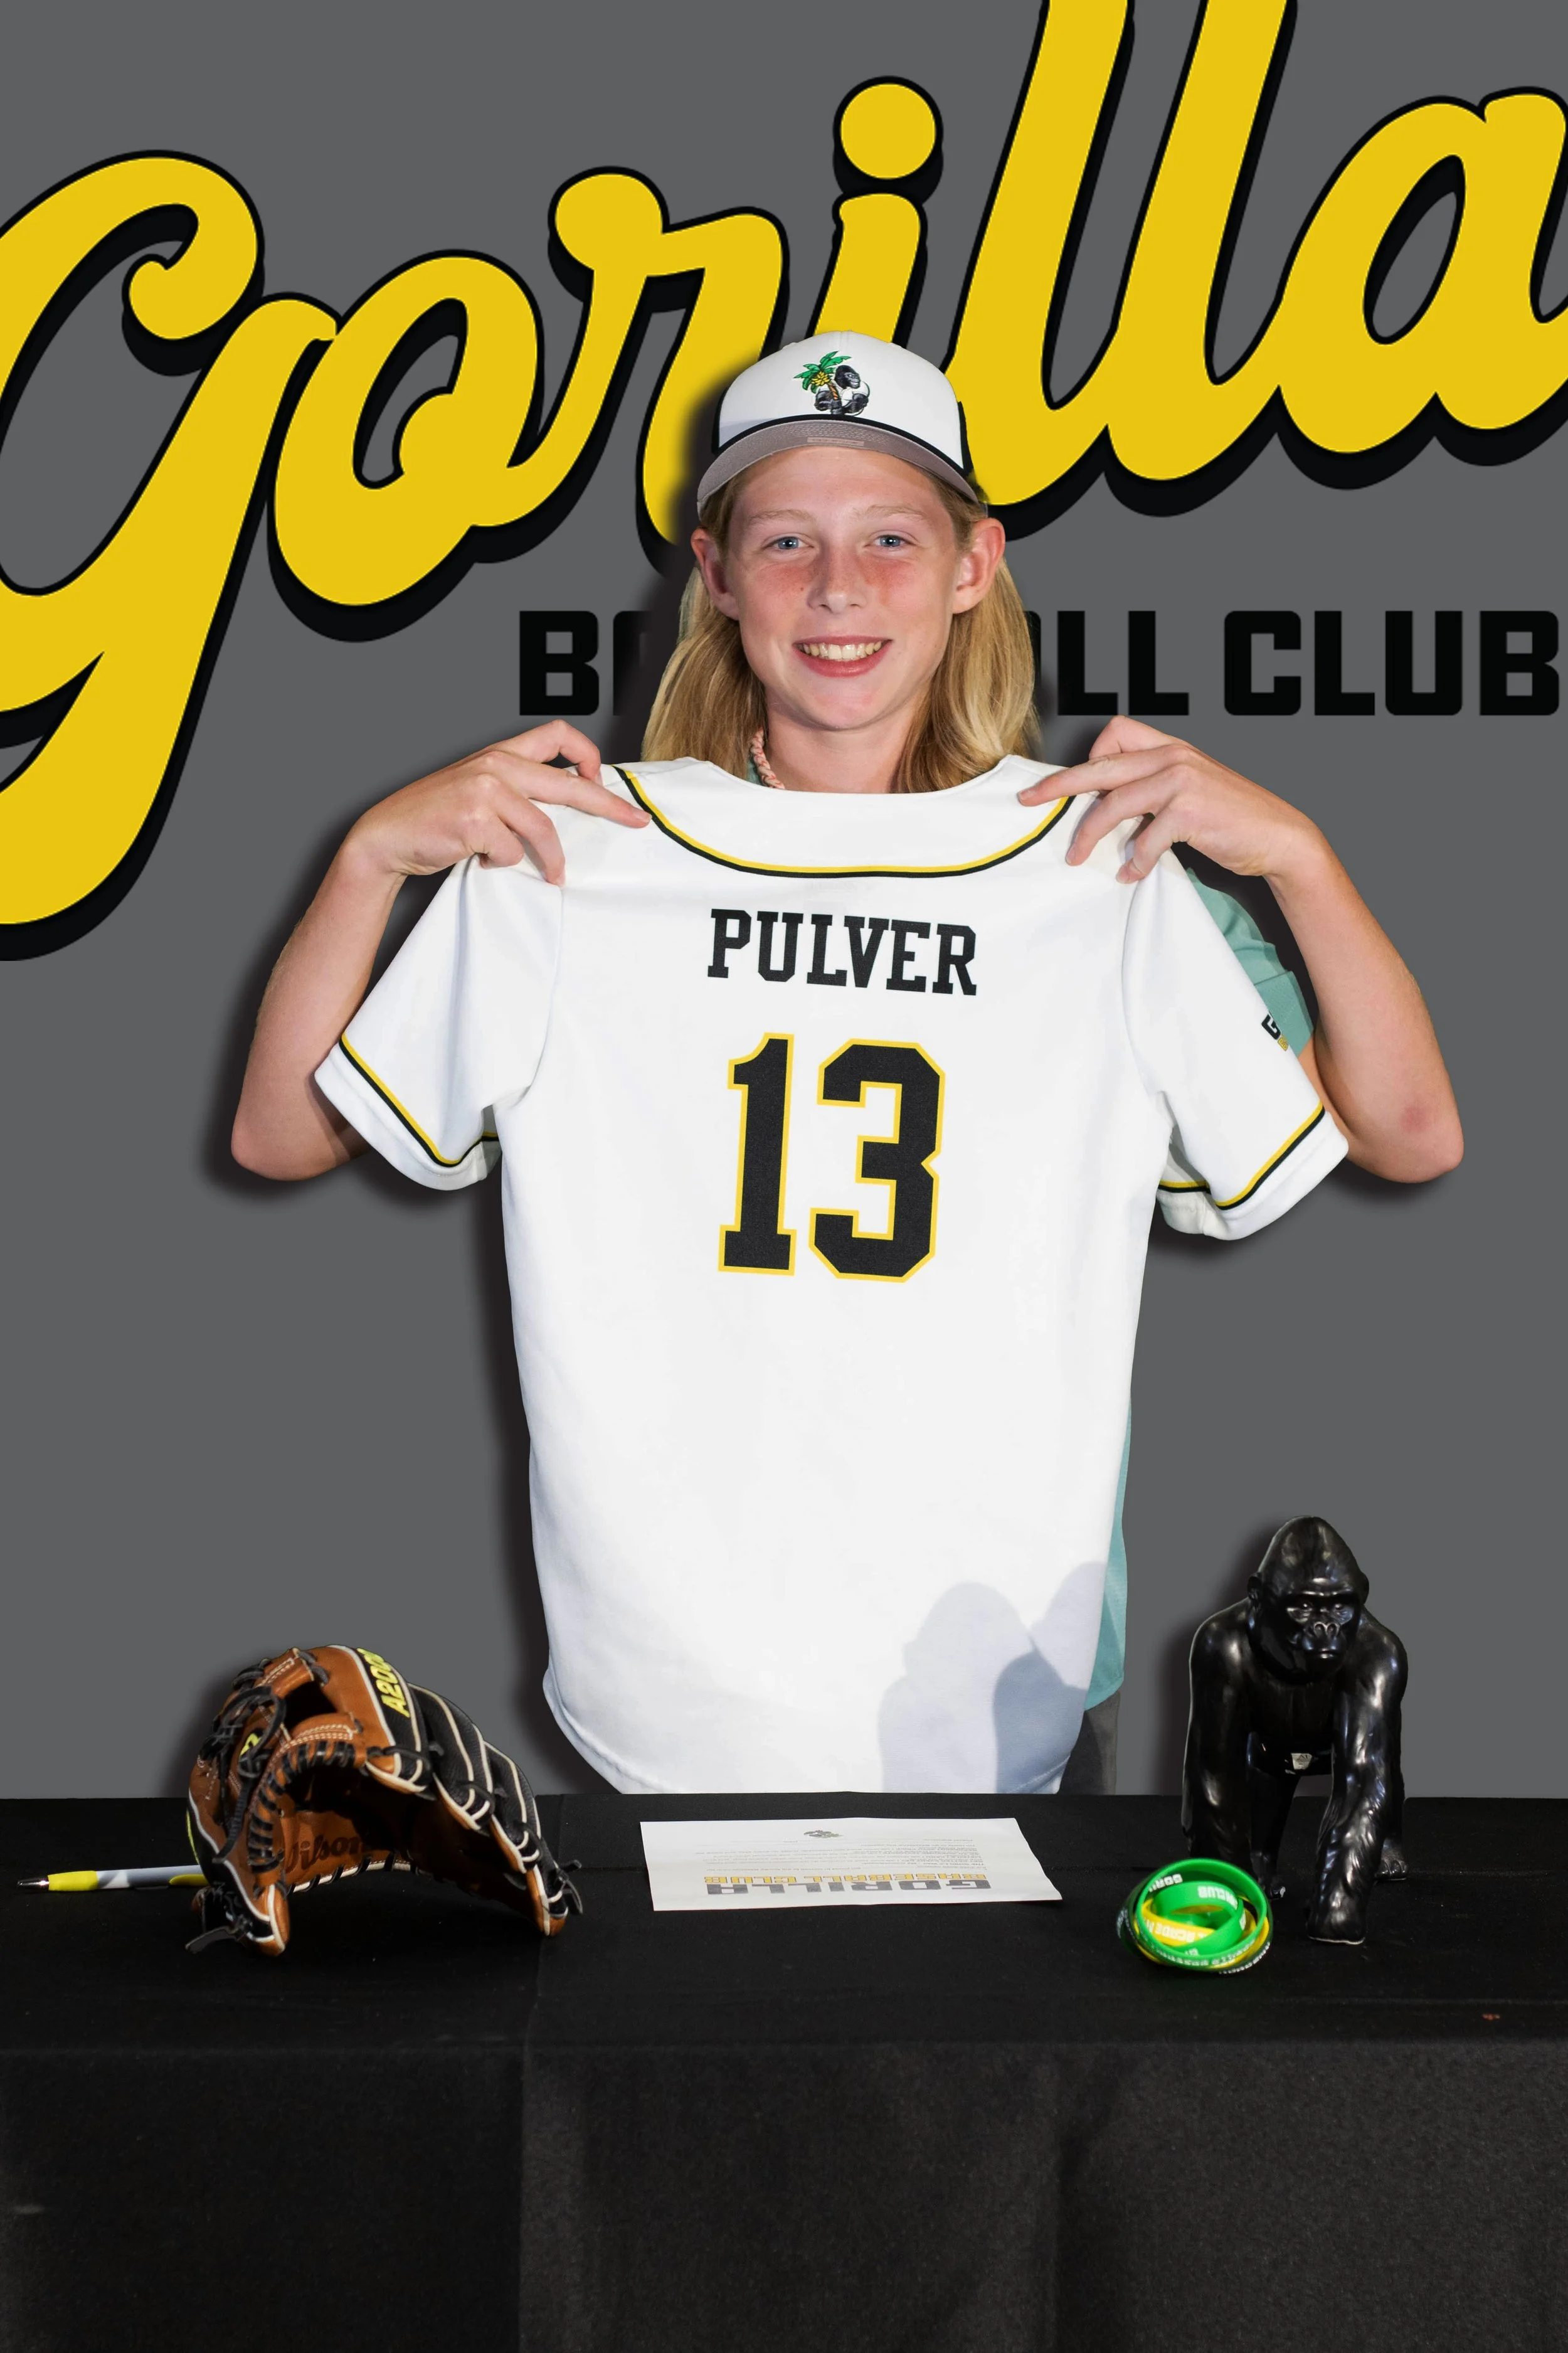
4. Holding up the jersey – Player holds their jersey out in front of them with both hands, displaying it to the camera. If the jersey has their name on the back, we made sure to photograph both the front (showing the Gorilla logo) and the back (showing their name and number). This is when having named jerseys really shines—it personalizes each photo.
5. Wearing the jersey – Player puts on the jersey and poses confidently in full uniform. Arms crossed, hands on hips, holding a ball—whatever feels natural. This is the 'I'm officially part of the team' photo.
But You Can Do Anything
These five poses worked for us, but don't feel limited. The beauty of this setup is that you can create any poses you want. Some other ideas we've seen or considered:
• Player holding a bat over their shoulder
• Player in a fielding stance with a glove
• Player holding a baseball toward the camera
• Player pointing at the camera (like 'I want you' recruiting posters)
• Player with arms crossed looking confident
• Player tipping their cap
• Action pose mid-swing or mid-throw (for advanced players who can hold the pose)
The key is to keep each pose simple, quick to execute, and meaningful to your program's identity. We chose poses that reinforced the 'signing day' theme, but if your program has different traditions or branding, build poses around that.
Creating Your Own Player Contract
Here's something we did that I'd strongly recommend: we created an actual Player Contract that wasn't just a photo prop—it was a real document that set the tone for what we expect from our players.
The contract included commitments like:
• I will be a good teammate
• I will try my best to do what the coaches ask me to do
• I will practice regularly to improve my skills
• I will represent Gorilla Baseball Club with respect and sportsmanship
• I will support my teammates and celebrate their success
• I will take responsibility for my effort and attitude
This is all in the effort to commit to being a better player—because that's what our program is all about. The Player Contract serves multiple purposes:
1. It makes the photos meaningful. The player isn't just posing with a random piece of paper—they're signing a real commitment to themselves and the team.
2. It sets clear expectations from day one. Players and parents know exactly what we value and what's expected.
3. It creates accountability. When a player is struggling with attitude or effort, we can refer back to 'Remember what you signed? You committed to trying your best.'
4. It reinforces program culture. Every item on that contract reflects our program's philosophy—development, teamwork, and character over wins and losses.
After the photo shoot, we actually had each player and their parent read the full contract and sign it for real. They took home a copy, and we kept a copy for our records. It became more than just a photo prop—it became a foundational document for our program.
Pro tip: Keep the language age-appropriate and positive. Focus on what players WILL do, not what they WON'T do. 'I will be a good teammate' is better than 'I won't be mean to teammates.' Make it something they're proud to sign, not a list of rules they're afraid to break.
Coaching tip: For younger players (9u-11u), give them specific, simple directions: 'Put both hands on the jersey,' 'Look right at the camera,' 'Show me your game face.' For older players (12u+), they can handle slightly more complex posing directions. Keep it professional and structured—the goal is consistency across all players, not individual creativity. The five standard poses kept everyone on track.
What We Learned
1. Keep it moving. Players get restless waiting. Have them come in waves (by team) rather than everyone at once.
2. Stick to the plan. We kept it focused on individual player photos only. Five poses per player, move on to the next. This kept the session efficient and prevented it from turning into an all-day event.
3. Keep poses professional and consistent. We stuck to our five standard poses for every player, which created consistency across all our photos and kept the session efficient. The structured approach helped players know what to expect and prevented the session from getting chaotic.
Post-Production: Creating the Final Images
This is where the magic happens. Good photo editing software is key to making this process efficient and professional. Here's our workflow:
Our Two-Step Editing Workflow
We used a two-program workflow that made handling thousands of photos manageable:
Step 1: Adobe Lightroom – Capture and Sort
Lightroom is designed for photographers who shoot large volumes of photos. We imported all 2,500+ photos into Lightroom and used it to:
• Organize photos by player name or team
• Rate photos with a star system (5 stars = best shot for each player/pose)
• Make basic adjustments to exposure, contrast, and color balance across all photos at once
• Flag the final selections to export for editing
• Quickly compare similar shots side-by-side to pick the best one
Lightroom's power is in batch processing and organization. You can apply the same exposure or color adjustments to hundreds of photos at once, which saves hours when you're dealing with this many images. For example, if all your photos are slightly too dark because of your lighting setup, you can fix all of them in 30 seconds rather than editing each one individually.
Lightroom tip: Use the 'Collections' feature to create a collection for each player. As you review photos, drag the best shots into that player's collection. This makes it easy to find Player #23's best signing pose or Player #47's best jersey pose later.
Step 2: Adobe Photoshop – Final Editing and Green Screen Removal
Once we selected the best photo for each player, we exported those files from Lightroom and brought them into Photoshop for the detailed editing work. Here's our specific process:
1. Isolate the player using selection tools. We used Photoshop's selection tools (primarily 'Select > Color Range') to select all the green pixels in the background. This tool lets you click on the green and it automatically finds all similar green tones throughout the image. Once selected, we deleted the green background, leaving just the isolated player on a transparent layer.
2. Refine the edges. Sometimes there's a green 'halo' or spill around the edges of the player, or the selection isn't perfect around hair or clothing details. We used the 'Refine Edge' or 'Select and Mask' tool to clean up these edges and make the cutout look natural.
3. Save the cutout as PNG. Once the player was cleanly isolated, we saved this as a PNG file with a transparent background. This allowed us to place the player on any background we wanted.
4. Place on the consistent background template. Here's a key efficiency point: we created ONE background design in Photoshop that was consistent across all players. This template was simple—a gray background with the Gorilla Baseball Club logo (large wordmark) and placeholder text for the player's name and team. We opened this template in Photoshop, placed each player's cutout PNG onto it, positioned and scaled the player appropriately, then simply changed the name and team text. Same background, same layout, same branding—just different players and personalized text.
5. Export the final image. Once everything looked good, we exported as a high-resolution JPEG (at least 1920x1080 pixels, we went with 2400x3000 for print quality).
Why one consistent background matters: Having the same background template for every player created visual consistency across all our photos. When parents shared them on social media or we posted team photos, there was immediate brand recognition—'Oh, that\'s a Gorilla Baseball photo.' It also saved us massive amounts of time. Instead of designing 60+ unique backgrounds, we designed ONE really good background and adapted it 60+ times by swapping the player and name. This is how you scale a project like this without losing your mind.
Why this two-program workflow works:
• Lightroom handles the volume – It's built for managing thousands of photos, making quick comparisons, and applying batch adjustments.
• Photoshop handles the precision – It's built for detailed editing, compositing, and creating final graphics.
• You're not reinventing the wheel for each photo – Fix exposure once in Lightroom for all 60 players, not 60 times individually in Photoshop.
Total editing time per photo once we had our workflow down: about 5-10 minutes in Photoshop for the green screen removal and final assembly. Lightroom sorting and rating: about 1-2 hours for all 2,500+ photos.
Software Alternatives if You Don't Have Adobe Creative Cloud
Adobe Lightroom and Photoshop require a Creative Cloud subscription ($54.99/month for the Photography Plan that includes both programs, or $9.99/month if you qualify for student pricing). We used Photoshop for both creating the background template and doing all the editing work. If that's not in your budget, here are alternatives:
For organizing and basic editing:
• Darktable (free, open-source, similar to Lightroom)
• Google Photos (free, basic organization and editing)
• Your computer's built-in photo management (Mac Photos, Windows Photos)
For background design, green screen removal, and final editing:
• GIMP (free, open-source alternative to Photoshop) – Has a 'Select by Color' tool for green screen removal and all the tools needed to create backgrounds and composite images
• Photopea (free, browser-based, works almost exactly like Photoshop) – No download required, supports PSD files
• Canva Pro ($13/month) – Background remover tool plus design tools for creating simple backgrounds, though less powerful than Photoshop for compositing
• Remove.bg (website, free for low-res, $9/month for high-res) – AI-powered background removal only, you'd still need another program for the final composite
We chose Adobe Photoshop because it handles everything in one program—background design, green screen removal, compositing, and final export. But you can absolutely get professional results with free tools like GIMP or Photopea if you're willing to invest the learning time.
Designing the Background
Before you start editing photos, you need to design the background that will replace the green screen. We created our custom background in Photoshop, keeping it simple and clean.
Our background design:
• Gray background (solid color)
• Gorilla Baseball Club logo prominently displayed (large wordmark)
• Player's name and team designation
• That's it.
Design philosophy: Less is more. We intentionally kept the background minimal—no busy patterns, no multiple logos scattered around, no slogans. The player is the star of the photo, and a clean background lets them stand out. The large Gorilla Baseball wordmark provides immediate brand recognition without competing for attention. We created one master template with placeholder text for the player's name and team, so we could quickly personalize each photo.
Sharing the Final Photos
Once you've created all the photos, you need to get them to families. Here's how we did it:
1. Photo hosting – SmugMug – We used SmugMug to host all the high-resolution photos. SmugMug is a professional photo hosting platform designed for photographers, and it made it easy to organize photos by team and share private galleries with families. Each family received a link to download their player's photos in full resolution. Alternative option: Google Drive works just as well if you want a free solution—just create folders by team and share links with families.
2. Social media – Instagram – We posted each player's photo to our Instagram account, tagging the family when possible. This generated engagement and shares, and gave families an easy way to repost to their own accounts.
Other social media ideas to consider: You could also post to Facebook (we kept it Instagram-only, but Facebook would work great for reaching parents), create a highlight reel video of all players for social media, or even create individual player announcement graphics (like college recruits do) with their stats or position. These photos are content goldmines—use them throughout the season for roster announcements, player spotlights, and more.
3. Print packages (optional) – Some organizations offer physical prints for a fee. We didn't do this the first year, but it's something we're considering for future seasons. Families love having physical prints, and it can be a small revenue generator.
The Results: Was It Worth It?
Absolutely. Here's what we gained:
1. Player and parent excitement. The photos made our players feel like they were part of something special. Parents shared them everywhere—on their personal social media, with grandparents, in texts to friends. It created immediate pride in being a Gorilla.
2. Marketing and recruiting. Every shared photo was free advertising for our program. We gained followers, got inquiries from prospective families, and built credibility. When potential players see current players looking like pros, it elevates the entire program.
3. Professional image. In a competitive travel baseball market, these photos differentiated us from other programs. We weren't just another team—we were a club that invested in making our players feel valued.
4. Content for the year. These photos became profile pictures for our social media team accounts, images for our email newsletters, and content for our website. We're still using them months later.
Total Cost Breakdown
Green Screen Approach (What We Did):
Equipment and Materials:
• Green fabric/backdrop: $30
• LED work lights: $0 (we used existing work lights already at our facility; if purchasing: $40-75)
• Backdrop mounting: $0 (we hung it from the netting cables at our facility; if needed: $15-30 for clips/hardware)
• Digital SLR camera with 50mm lens: $400-600 (entry-level used) OR smartphone: $0 (if you already own)
• 50mm lens: $100-200 (if not included with camera)
• Remote camera shutter: $15-30
• Memory cards (2-3 high-capacity cards): $30-60
• Photo editing software (Adobe Photography Plan - Lightroom + Photoshop): $10/month or $120/year
Our actual costs: ~$575-890 total (including camera gear and first year of software)
If you already have a camera/smartphone and use existing facility lights: ~$175-240
Ongoing: $10/month for Adobe Creative Cloud
Time investment: ~20 hours total (setup, photos, sorting in Lightroom, editing in Photoshop)
Budget-conscious note: We saved money by using resources already available at our facility—existing work lights and netting cables for mounting the backdrop. If you have a baseball facility, you probably have similar resources you can leverage. If you also already have a decent camera or smartphone, and you use free software alternatives (GIMP instead of Photoshop, Darktable instead of Lightroom), you can do this entire project for under $50 (just the green fabric and some basic mounting hardware). The most important investments are the green screen material and proper lighting—those are non-negotiable for quality results.
Step-and-Repeat Approach (Alternative):
• Custom step-and-repeat banner (8'x8'): $300-500
• Banner stand: $100 (or DIY with PVC for $30)
• Lighting: $40-100
• No editing required
• Time investment: ~5 hours total (setup and photos)
Total: ~$400-600 upfront + 5 hours of time
Our Recommendations for Your Program
If you're a new program or experimenting: Go with the green screen. It's cheaper, gives you flexibility to change your design, and you'll learn a lot about photography and editing along the way.
If you're an established program with a strong brand: Invest in the step-and-repeat banner. It'll save you time in the long run, looks professional immediately, and can be used for multiple events throughout the year (tryouts, end-of-season banquets, parent meetings, etc.).
If you have zero budget: You can still do this! Use a blank wall, position your players well, and take quality photos with a smartphone. Use free editing tools like GIMP or Canva's free version to add text overlays and your logo. It won't have the 'wow' factor of a full green screen setup, but it's better than nothing.
Or let us handle it for you: Don't have the time, equipment, or desire to tackle this yourself? Gorilla Baseball is available to run signing day events for other clubs. We bring the equipment, handle the photography, do all the editing, and deliver professional photos to your families. Your players get the full signing day experience without you spending 20+ hours on setup and post-production. Contact us to discuss pricing and availability.
Common Mistakes to Avoid
1. Poor lighting on the green screen. If your green backdrop isn't evenly lit, you'll spend hours trying to remove shadows and inconsistent green tones in post-production. Get the lighting right during the shoot.
2. Players too close to the backdrop. This causes green color spill on the player (they'll have a green glow around them). Keep at least 3 feet of separation.
3. Cluttered backgrounds. Your digital background should enhance the player, not compete with them. Less is more—keep the design clean and focused.
4. Not taking enough shots. Kids blink, move, or make awkward expressions. Take 10+ photos of each player so you have options. You only need one great shot per player, but you need multiple attempts to get there.
Final Thoughts: Make Your Players Feel Like Pros
At Gorilla Baseball Club, our approach emphasizes player development, team culture, and treating baseball seriously while keeping it fun. These signing day photos perfectly captured that philosophy. We treated our 9u players with the same respect and celebration that college recruiters give to high school seniors. We told them, 'You're part of something special, and we're excited you're here.'
And you know what? They believed it. They stood taller, they were more engaged at practice, and their parents appreciated the effort we put into making their kids feel valued.
Whether you use a green screen, a step-and-repeat banner, or just a clean wall with good lighting, the message is the same: your players matter, their commitment matters, and you're building something worth celebrating.
So grab a camera, set up a backdrop, and start shooting. Your players will love it, parents will share it everywhere, and your program will benefit from the excitement and professionalism it creates.
Or Call Gorilla Baseball and We'll Do It For You
We know you're busy running practices, managing rosters, coordinating tournaments, and handling the hundreds of other details that come with operating a travel baseball program. Adding a professional photo shoot to your to-do list might feel overwhelming.
That's where we come in.
Gorilla Baseball offers signing day event services for other clubs and organizations. We bring all the equipment, run the photo session, handle all the post-production editing, and deliver professional photos to your families. Your players get the full signing day experience, your families get amazing photos to share, and you don't spend 20+ hours learning photography and Photoshop.
What we provide:
• Complete on-site photo setup (backdrop, lighting, camera equipment)
• Professional photography session with structured poses
• Post-production editing and green screen compositing
• Custom background design featuring your club's branding
• High-resolution digital delivery via SmugMug or your preferred platform
• Optional: Player contracts and signing ceremony props
Interested? Call Gorilla Baseball to discuss pricing, availability, and how we can customize a signing day event for your club.
Questions about doing it yourself? Want to see examples of our final photos (see above)? Reach out to us at Gorilla Baseball Club or check out our Instagram (@gorillabball). We're always happy to help other programs level up their player experience—whether you do it yourself or hire us to handle it.
— Coach Dolenga
Owner, Gorilla Baseball Academy & Gorilla Baseball Club
www.gorillabball.com
Contact us to discuss a signing day event for your club.